Friday, April 17, 2020

From Couch to Chair - Part 1 and 2


My wife finally decided that the couch was too big for her crafting room. Honestly, it was too big for this house. We bought it prior to moving here and it hasn't ever had a good fit. 

We tried having it in the "living room". After a year or so, we decided to move it to her crafting room which had recently been relocated to the first floor. The couch had to go through our bedroom, out the sliding windows of the sunroom, carted around the exterior of the house, back in through the front door and finally into the crafting room. Like the workbench, it's a beast. 

Now, after being in the crafting room for some time, it's too big and needs to be repurposed. Time to make it a chair! (I hate to admit this is actually the second couch I've torn apart in the last 5 years.)


I yanked it into the hallway and tipped it over. Time to see what I'm dealing with. 


Pulling the bottom dust cover off, I see that it's braced in thirds and the arms are boxed in with press board. I've got my plan of attack figured out. 


 With a utility knife I slice the pillows and save the stuffing. I also cut into the canvas. 


Then I completely saw through anything holding the arm assembly to the frame. 


I toss the arm assembly onto the bench to clean it up and trim the canvas. 


I then prepare to cut the center third out of the frame. 


The center has been removed. 


That's what is left, and the main part of the new chair. 


I then trim the excess bit off from the main portion. I want to even the rails to properly receive the arm assembly. 


I left the two middle rails long as they would slide into the slots on the arm assembly. Those seats springs are quite powerful and gave my knuckles a good rapping. 


Using a couple braces, I slide the seat rails into position then screw the arm assembly down to the seat frame. 


A little tucking and stapling, left the canvas looking like it had always been there. 


I also used staples to close the open end of the pillow and secure it to the frame. 


I pulled the back canvas back into position and stapled that as well. I also stapled the bottom dust cover back into place. 


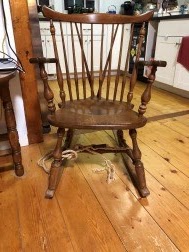
And now we have a new old chair. 


Gilbert will enjoy the left over pillows.

Dan.

Monday, April 13, 2020

Close the Gate!

As I mentioned earlier, a few of our goats are pregnant and will soon give birth.


These are all the females getting a greeting from Roger Collins, the alpha male, and only non-Nigerian Dwarf we own. 

While everyone was running around, I fixed the birthing pen gate, which meant installing hinges and welded wire to the open bits. 


I had these hinges in the workshop for a little while. I'm sure I had some purpose in mind when I bought them, but they will work well here. The gate is quite light. To install the hinges I only had to cut the rails in order to fit it in the frame. 


Leaving rails long on the other end, I use them to keep the gate closed with a simple latch. 


Here, the latches are shown holding the gate closed. 


Victoria Winters and Franny, now in the birthing pen, patiently waiting to have their babies. 


Friday, April 10, 2020

Work the corner a bit more


One of the best ways to prevent splintering and unsightly dings in corners is to work them a little more.

Whenever I build a piece I normally work the edges down with a handplane or sandpaper to take that edge off, breaking the edge.


This stops me, or anyone else, from getting cut or splinters. This also softens the corner and reduces the chance of dents.

Historically, beads on door jambs and wall corners protected the corner from chairs and other accidental dings.


On tables, such as the workbench, I run the handplane on the bottom edge, lifting the edge slightly off the floor.


And on the workbench, I taper the dog holes to keep them crisp, saving the edge from constant holdfast usage.


Dan.

Wednesday, April 8, 2020

From NC wall boards to feed trough

The weather has been quite decent the last few weeks. The snow has mostly melted and we are under orders to "Stay Home, Stay Safe." To the homesteader, life goes on as it always does. I just can't go buy toilet paper when I want.

The goats and the chickens (and all the other resident mouths-that-that-need-feeding), haven't realized the world has currently gone loopy. They don't need toilet paper, however, they do need other things and two of the ladies are due to give birth any day now.

Ahem. This is not a post about them. This is a post about a feeding trough.

As I was prepping the birthing pen, I decided to move the home-made hay hopper from the girl pen to the birthing pen. Since I was also using the hopper as a feed trough, I have to fabricate the girls a new feeder.


Digging through the second floor of the barn, I found some tongue and groove wall boards that I took down when remodeling our house in North Carolina, which I transported up north during the move. Exactly why I saved them, this is a perfect use for it.

I quickly saw it in half and edge nail it together.


This bit is a cut off from the flooring in our current house, which was also found on the second floor of the barn. Seems to fit just about right. 


I saw it in half...


and nail it to the ends of the wall boards. 


This was so easy I'm embarrassed to blog about it. 

Here it is below the new hay hopper. 


I didn't like it there so I moved it to the other corner. Elizabeth Collins gives it a looking over. 


There is no problem with getting them to use it. 

The two ladies on the far end are Victoria Winters and Franny, our expecting mothers. Elizabeth has gone from looking at the trough, to standing in the trough. She was planning her attack when all the seating is taken. 

My wife really liked this trough and wants one for the buck/wether's pen. Those guys are currently eating off the floor and honestly don't seem to mind. 

Dan.


Monday, April 6, 2020

Quick cabinet hinge repair


Hey, what the heck is going on here?


Oh, I see. I've been using the cooling rack lately and it wedged behind that hinge, forcing the hinge apart when I closed the cabinet. 


It's just a simple screw holding the two pieces of the hinge together, not broken. 


Just a simple matter of loosening the screw, returning the door side of the hinge to it's proper location, and retightening the screw. 


Ok, so I had to take it back apart to adjust it. There are little ridges where the two halves of the hinge meet. I had to shift the door side out about 1/4-inch. 


That's better! At least it was an easy fix. 

Dan.


Friday, April 3, 2020

Rock Buh-bye glue joint

Chairs are one of the most abused furniture pieces in your household. Constant strain is placed on the joinery and glues can breakdown and fail over time. It doesn't help when large companies mass-produce chairs and starve the joinery in order to save a few pennies per chair.  

As an example, I have a rocking chair that dates to the 1970's. It's not fancy but I like it, it's "my" chair. Naturally, my 200 pound frame will test the joinery to it's limits and it's a good example of a glue-starved joint. 

Taking it to the chair to the shop, I test all the joinery and glue-up the ones that have failed. 

I personally only use hide glue on my indoor projects. I like the ability of it sticking to itself in later repairs, the fact it is non-toxic, and easy clean-up with water. 


To hold the joint closed to allow the glue to set, I grab a length rope kept in the shop for this reason. Add a small peg made from a length of pine I shaped on the shaving horse and you have a home-made tourniquet clamp. This is an old-timey method that is unbeatable for clamping odd shapes and rounds. 

The technique is simple; twist the rope as much as you can pinning the peg so that the rope remains taut while the glue dries. 


I normally allow at least 24 hours when using hide glue. 


Of course, after finishing one repair, I had another location that needed a glue up. 

If this was a piece I had to repair for a customer, I would had given all the joints a solid whacking with a rubber mallet the first time to ensure everything was good before returning it to them. Not something I always do for myself. 


When all is finished, the chair goes back to it's spot in the common room, ready for more Dan rocking. 

Dan. 


Wednesday, April 1, 2020

Cornering the Stained Glass Lamp

There is a requirement for some people to consistently move things around in their lives. There are theories that this is a sign that something is not quite right, maybe they are unhappy with things. I think some people just enjoy to change things up a little bit from time to time. It also allows them to dust under and around things which I obviously do not do.

I tend to leave things as they are until I trip over the fully-formed and now sentient dust bunny. My wife is thankfully a "move things around" individual. She is mostly unhappy that I do not dust (or vacuum) under things. Obviously, when she wants things moved I help as much as I can. Let's face it, I owe her.

Recently, she wanted a small lamp with a stained-glass shade moved to the lower shelf of our corner cabinet. Unfortunately, it was about 1/8 inch taller than the space allowed, and these shelves are not adjustable. Honestly, I can't think of any shelves in our house that are adjustable.


Back to the lamp. First, I checked my peanut butter jar full of spare nuts, nothing there. 

Then I checked the other lamps in the house, only one lamp had the same retaining nut threading, but it was as tall as the one I was replacing. 

Hey, this coaxial cable nut seems to be the same size! So, I snipped the connector off and sawed the nut from it. Who uses coax anymore? Turns out the size was right but the threading was wonky, or "not-the-same".

Finally, I decided to shorten a retaining nut from one of the lamps. I choose the less decorative of the two, it also had a small lip on the bottom that would hide the alteration nicely.


I had to find some way to hold the small nut securely to work on it, it wouldn't do to have it rolling everywhere while trying to work on it. In short order, I quickly notched a 'V' into the jaws of a small hand screw. I've got two of these that I don't use very often and can easily make another if I feel I can't live without. 


The notches allow the nut to have four points of contact with the holding device. I then filed down the soft brass retaining nut past the lip.  


Ah, after all that, the lamp fits!


Of course, other alterations to the cabinet have to be made to accommodate the new immigrant. I made a second hole to put a Scentsy warmer on the middle shelf.


This is how it looks this morning as I write the blog.

So things are dusted
     and Easter has moved in.
Everyone is happy,
     until we have to dust again.

Dan.