Showing posts with label Job Guide Shelf. Show all posts

Sunday, January 3, 2010

Job Guide Shelf - Day Five

Happy New Year!!! 

I hope everyone has their resolutions listed and is ready to take on the New Year. It's going to be a great year! Now that the obligatory happy has been complied with, LET'S GET IN THE SHOP!!!

It's a little bit chilly in the garage (um, shop), so I pulled out the space heater that I adopted when I bought this house few years back. It looks like the electrical cord was spliced in order to extend the length. It's a rather poor job that was done with a couple of twist caps and some electrical tape. It will do for the time being but will need to be replaced in the future (that's "Air Force Safety" talking). With the space heater running and doors closed, the working temperature was soon comfortable.


During the last posting, I had realized that the height of the separators were too long and had taken a 'break' to think things through.


After test fitting the separator that I had previously trimmed, I decided that it would work and used some double sided tape to flush trim all 15 separators to the same size...again.


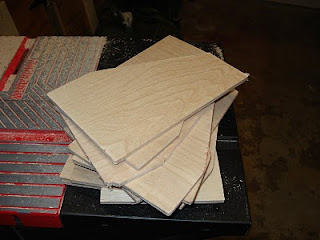
I rushed the process and the tape slid from one of the pieces, making a little dimple in the separator and thus reaffirming my decision to only use hand tools on future projects. You can see the offending little separator below; it is the third one down.


After a little sanding I put the original three separators back in and did a little glue-up. I also tacked them in place using brad nails. Those of you with any woodworking experience or any foresight what-so-ever may realize that I just glued-up and brad nailed 3 separators...of 15. 15 is the magic number.


Since I lack both experience and foresight, I measured and cut another dado using the "measuring scrap" from the day prior. Correction, I used the scrap to measure and then the allen wrench chisel to cut out the dado.


I got three more separators installed and decided that I could lay out the remaining cuts and do them all at once. Of course I decided this once I cut into my "measuring scrap" and then made dado for a separator at 1.5 inches instead of 3 because I held the ruler backwards.

Needing a new strategy, I used a small metal ruler and used a razor to mark the lines as precisely as possible, the rest was up to luck. The framing square was used to ensure my lines were square to the back of the shelf. A little over-kill, but I dropped and broke the small carpenter's square early that day.


I made short work of the dados on the top side.


After completing the top side, I moved on to marking the bottom.


Ah, that took much less time. There is a lesson to be learned here about chiseling out part of a knot, especially one that has epoxy to ensure that it doesn't fall out. I will make a list of lessons learn after the completion of the project, it will need a post all to itself.


After completing the dados, I glued and tacked 11 separators leaving the last one until I figure out how to make the horizontal shelves.

[Editor's note: if you look closely below, the fifth separator from the left is crooked. Not only did I glue up the separator not in the dado accidentally, but I also used brad nails to tack it into place. Doh! I'm still trying to figure out how to fix that the next time I visit the shop.]


Tuesday, December 29, 2009

Job Guide Shelf - Day 4

Seems like I've been working on this shelf forever. I'm almost surprised that it's only been 4 days of work.

At the end of day 3, I realized that I did not check the previously cut sides on the template for square, which could cause a problem in the long run. So the first thing I did on the next time I visited the garage was to check the template...which turned out to be a little off.  Yay, me!


I clamped the plane to the table and quickly squared up it up.


I then used the guide clamp to draw a line 8 1/8" from the bottom edge of a piece of 3/16" birch plywood that I picked up for a previous project...which is still unfinished. The clamp, at 52", is the only straightedge I have long enough to cover the length of the plywood. 


I decide that this is a good time to use the Disston saw!


After about 18 inches into the cut, I realize I'm not going parallel to the line. I tried and I tried and I tried to straighten the cut, but turning this saw in the middle of a cut is not possible...or I need more practice. I could have continued the cut, but I wanted to waste as little as possible. This sheet of plywood needs to be available for all 15 vertical separators and the 3 horizontal shelves.


I felt a little bit of guilt as I reached for the jig saw. That guilt ended as I flew thru the plywood. I was happy to save the cut.


I used the trusty wood clamps to set up a quick planing job.


I then traced the template on the plywood, saving room for the kerf between each piece. Total separators per plywood = 8. I cheated again, and used the jigsaw to cut them all out proud of the line.


Since I had the jigsaw already out, I measure out the next cut and begin to saw. At about the halfway mark, as my leg was brushing against a rough edge, I realize that I'm cutting on the wrong side of my mark. Leaving me with two pieces, both too short. (This mistake is most likely due to the Galoot spirits being upset at me for using the jigsaw)


After a moment of thought, I traced the template and fitting six separators. The seventh had to be traced onto the other section of plywood.


15 separators, in the rough. 


After that, I used some double-sided carpet tape and secured my template to one of the rough-cut separators. The router table was set up with a flush trim bit and I used logic to tame the guilt of using yet another powered device. I figured that I had already cheated by using the jigsaw, and I honestly couldn't think of a better way to make exact copies. (Actually, I had freely used power tools on this project before I started this blog.)


The template was too thin and let a little section of the separator not trimmed. I pondered this for a moment and flipped it over to get the rest. Sweet! After the first one was complete, I used it as the template and quickly flushed up the remaining 14 separators.


Sanding then made short work of the splinter edges and smoothed the separators.


Proud of my progress, I had enough self confidence to work on the dados. Needing a small chisel (3/16"), I made one using an old allen wrench. I flattened one side using the bench grinder.


I guess-timated a bevel for the other side, one that could handle a little pounding and sharpened it further with the same sharpening "station" I used on Day 2.


This is the first dado. Using a scrap piece 3" wide to keep the spacing even I used another scrap from the previously cut separators, and used a blade to mark the dado to exact width.


This is the first separator in place. Funny that I didn't notice the bowing while I was working on it. I think I was too excited that I was making progress.


Full of vigor, I make a second and then a third. Upon the installation of separator number three, I heard a crack and thought "uh-oh". That's when I noticed the bowing.


Discouraged, but not willing to give up, I removed all three by using a clamp to jack the top and bottom apart enough to slide the separators back out and trimmed one of them to fit. After a test fit, I worry that I trimmed it too much.

I decided to call it a day, before I could make things worse. I headed inside for a beer.Beer, you are my only friend. Today's brew, "Hello my name is Beer", is a Christmas present from my buddy Mark and you can see how he makes these wonderful brews on his blog. (btw, it was a great beer)


Saturday, December 12, 2009

Job Guide Shelf - Part Deux

(This post was rather long, so I decided to split in twain, making it a double post day!)

The Now

I've been debating how I should tackle this project since I have decided that I would like to woodwork without the use of power tools. Even if I decided to not use power tools, this project would still be marred by the fact that it had been touched by power tools, actually I was procrastinating because I wasn't certain how I wanted to cut the back panel. Let me rephrase that, I wanted to cut it square...I just wasn't sure that I was capable of that. I finally settled on cutting it close to dimension using the circular saw and planing it down.

I was so excited! I was anxious to plane. I've owned planes (a whole 3, including the one from the last post), but was never interested in sharpening them. My planing past is not something to brag about. I've since learned how to sharpen and was ready to try my hand.

I've tried many different set ups to sharpen: a slow grinding wheel, a fast grinding wheel, my grandfather's grinding wheel (serious). Nothing has ever made me feel good about sharpening. Then I read about the 'scary sharp' system.

At first, I thought the scary sharp was some sort of costly $500 gadget. I was seeing references everywhere I was looking. I was shocked to find out it was only sandpaper on a sheet of glass. Are you serious? I can sharpen my tools with this?? Why the heck didn't any one mention this to me before! Here I am working with dull tools because I can't sharpen to save my own life (I use disposable razors).

So I decide to use the scary sharp system to sharpen my #4 jack plane's blade, I really want to use this thing. I had a variety pack of sand paper, that should work and figured i would go get some spray adhesive and some glass at Lowes.

I head out on the town on my way to Lowes. Traffic is as only holiday season traffic can be, "are you serious, people?" mode. Soon, I find my driving happy place, the "I don't care how fast you think you should be going, I am not letting you get me in an accident" place. I get to Lowes safely, in once piece and head inside to find some spray adhesive. About 200 paces inside the store I realize that I left my wallet at home. "I guess I didn't really need glass or spray adhesive at this time," I think to myself and head back, avoiding the holiday crash derby.

Laying a sheet of sand paper on the work bench, I hold the sheet with one hand and move the flat of the plane iron over it. I had colored it with a permanent marker to check for low spots, and when I picked it up to see how flat the flat was....hmmm, this might take some time. What did I expect? The plane was a gift for a Harbor Freight shopper and was made in India, the sticker told me so. Even so, I would persevere!


I sanded on the work bench (ie, solid core door) surface, then upped the grit to 100 and then again to 60 (normal people people go the other way, not me, I'm special). Still worried about uneven surface of the work top, I tried sharpening on the wall mirror I have in the shop (don't ask). Yep, I held the paper to the mirror and tried that...that didn't last long, how did I think I was going to use the honing tool up there. I finally decided to find some old picture frame and use that. Searching the house I found my old bartender certificate behind a sheet of glass. Triumphant, I returned to the shop.
Flattening out the flat side of an iron sucks.... really. After getting it flat, I honed the other side and made a second bevel and then tried it out. OOOOOO, I was liking this. I tried it on end grain and it worked great! Proud of myself, I finally stopped procrastinating and cut the plywood.

Using a saw guide and circular saw I cut the plywood to length, leaving about it about 1/16 proud. Then I had to figure out a way to cut the length. I didn't have a rip saw yet, so that wasn't an option. My clamp guide was only 50" long so I couldn't use that either. I pieced together a couple of scraps to make an impromptu panel gauge and laid out the last two cuts I needed. I also cut them proud to allow a margin of error and would plane it down to its final dimension.


Here's a shot of my planing set up; a couple of wooden 8" clamps held onto the work bench with quick clamps. (and a beer)


...and a shot of the plane making some really good shavings.

After shaving it down, I fit it in, making minor corrections with the plane. I was ready to glue up!
I put the glue on, and set the back panel in place. I measured the corners to make sure it was square and used brads to hold it in place. Well....I used brads. My use of brads seems to mean that "holding" is optional. Some of my brads missed since I had planed the board so thin. In the end I put some clamps on it, cleaned up shop, and called it a night.


Here is the end of the day's efforts. You can see the impromptu panel gauge sitting on the lathe cabinet.

Job Guide Shelf - A History

I wasn't expecting to spend time in the wood shop today, but then again, until I finish this final 20-page essay for my degree I didn't expect to send any time in the shop.

The essay is not going well. I'm supposed to write and cover the knowledge I've gained in my classes over the course of the past two years, but I'm not really sure how much of that I have retained. I submitted a proposal to write a paper about the economics of forestry and its relation to manufacturing which was accepted, but I'm really having a difficult time trying to decide where to go with it. I find great resources every where, but I always seem to uncover more than I expect. My knowledge of the subject was so much less than I anticipated and thinking too hard about it has been giving me headaches and completely stressing me out. So, even though I told myself I wouldn't hit the shop until the project was over, I went out anyway.

History
I figured that I could work on the job guide shelf for work, which has been sitting there lonely for the past two weeks. This project is basically a 9" x 60" shelf where a collection of 5" tall books can sit and look pretty. The books that will reside in this shelf are currently sitting in a pullout drawer that is too short and causing damage to the covers. It has been annoying me so much that I want to build some sort of shelf for them.

Using scraps of wood from the shed, I started making some plans for this shelf. I found some suitable left overs and headed to a friend's house to use their power planer (this was before I decided to stop using noisy tools). I had two longer pieces for the top and bottom, and one square piece I was going to rip into two end pieces.

Having them all planed, I ripped and cut them down to size: one 3" x 60" for the top, one 6" x 60 for the base, and 2 sides that were 6" at the base, 3" at the top, and 9" tall. In short time, I had a rabbit cut into all of them to hold a plywood backing and was ready to cut dadoes for the separators.

This is where it gets all sorts of ugly. Trying to think of a way to space the dadoes evenly was a challenge. At first I tried the table saw...no good, the piece was too long and the dado came out crooked. (Looking back, I guess I could have used the circular saw with a guide...duh). I then came up with a setup on the router table that would let me space the dadeos exactly at 3". That worked decently until I had too much of the board over the end of the table, causing another set of crooked dadoes. You figure that I would learn to take the tool to the wood after the first failed attempt.

Giving up, I took the top and bottom sections back to the planer, located 2 miles away and planed the dadoes back out, deciding to glue the separators in place. I then cut rabbits for the joints (I'm still not brave enough to try cutting dove tails) and glued the pieces, holding them together with brad nails. This brings us to now.

Here it is, sitting alone on the work bench for the past 2 weeks.

(continued in part 2)