Monday, March 15, 2010

Job Guide Shelf - update

To say it bluntly....I made a boo-boo

The job guides are about 1/2 inch too tall for the inside of the shelf. How did that happen?


Hmmm...I think I measured the sides 1/2 inch taller than the books....unfortunely, I made some rabbets and dropped the top and bottom in, reducing the inside height to less-than the job guide.

Back to the house...gotta fix it somehow. Lesson learned.

Civil War bench challenge

While waiting for the paint to dry between coats on the Job Guide shelf project. I spotted an 8 foot pine board hiding under some rotting press board in my temporary neighbor's yard. I mentioned to him that I could take that one board and make a civil war replica bench out of it before the sun went down (about 2 hours). This is important since the work-shop is located mainly outside. He didn't think I could so I considered it a challenge. My only alterations were the use of a jig saw, cordless drill, and screws, which he was fine with. He took up my camera and followed best he could:

This are his pictures...(mostly).

Ah, board. Soon you will feel my hands all over you.


Lining up for the first cut.


I marked up all my cuts before hand....bad idea.


I used this clamp to guide the jig saw straight...another bad idea.


This will be one of the legs. (Eric has fun with the camera. I like to think that he was so exited that he forgot to take the pictures. I think he was doing the pee dance at this time and went running away for a time.)


To lay out the legs I measured the center and found a 45 degree combo that I liked.

Using the seat as a straight edge, I lay out the cut line for one of the skirts.


Another shot of one of the skirts.


Too fast for Eric.


I layed out 45 degree angles on the ends of the skirt boards.


Buzzzz...I cut.


I then used the discarded corner from the skirt to draw the notch on the legs.


Cutting out the legs.


Leg complete.


Cutting out leg number two.


I tried to explain how the pieces would fit together.


At this point, he finally got it.


Eric was called away to help family at this point. I clamped on of the skirts on and predrilled some countersunk holes.


Both skirts screwed into place.


I then measured in and squared up the legs and screwed them into place. (Eric's back)


He likes taking pictures. . . of non-action things.


Flipping the bench over, I layout the line where the screws will be placed.


This is me ABOUT to predrill.


Almost done.


Last screws.


Finished! I was actually sitting on the bench when he took this picture. This is the bench I replicated loosely.


Eric decided that he would like to keep this bench. Total time taken to make the bench = 45 minutes.

I had a great time doing it and I'm sure it's not the last one that I make.

Job Guide Shelf - Fin!

I finally finished the job guide shelf! Here is the picture story!

And we begin where we left off the day prior. Here, Josie is inspecting the workspace for squirrels.


This is a collection of the tools required...radio, optional.


First and second coats on the large, flat, easy, surfaces.


Josie and I take breaks while the paint dries. She likes to fetch.


First coat on the interior, a not-so-flat-boring-easy surface. This took a LONG time.


Many back-stretchings later, I am complete.


I installed the little rubber feets, they had adhesive backing.


Close up.


I add my trademark in permanent marker. "DrC", my initials and a PhD in stupid.


Ahhhh, is done. I will bring it to it's new home tomorrow.

Sunday, March 14, 2010

Job Guide Shelf - Optimus Primer

Ah, it was a beautiful day in central Texas. Beautiful enough to work on the Job Guide shelf (and get it out of my House-on-wheels).

This is what the project looked like at the start of the day. Pay no mind to the chair, I wasn't using it.


I used a chisel to completely level out the tenons. I would have used a little wood filler to completely cover them but I ran out and decided to leave it as a "character mark".


I realized that I hadn't shown a picture of the other side of the shelves on my previous posting. Here it is showing the rounded cuts made with the coping saw.


I did a lot of sanding and chiseling to smooth things out and make them "flow" a little better. (I used a palm sander on the flat surfaces and did the separations by hand.)


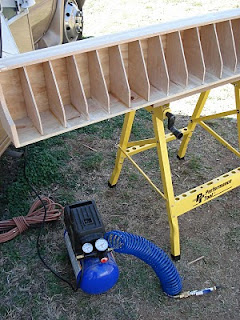
I used a small air compressor to blow out the dust and pieces left behind by sanding. It was too loud for my wanna-be galoot ears.


Here I am coating with primer. I decided to go with a high-gloss gray paint to match it with the metal shelves as much as possible. I will buy a better brush to try and eliminate the brush stroke lines.


Here it is, completely primed and back inside after drying a few hours.

Tomorrow is supposed to be another beautiful day, so I should be able to get it painted. Stay sharp, my friends.