Thursday, October 28, 2010
Bench Plane Madness - Phase 3
Other than burying little friends, I've been woodworking! That's what I do....that's how I roll.
Monday saw another week of turning at HOW, where I picked up a random log of what is believed to be olive and had planned to a few bottle stoppers, but the wood spoke to me and wanted to be a spurtle, which is a pot stirring stick. Turning surprises me because unlike the other woodworking I have been doing, which is full of planning and design,allowing me to see the end product in my mind; turning is exactly what that isn't. Oh, I normally have a general idea of what I am going to turn when I put a piece on the lathe, but rarely is that what happens. As I turn, I let the wood's grain talk to me and projects end up having a mind of their own (Actually, I blame this mostly on tear out and my ability to leave the lathe while stabbing the tools into the turning stock repeatedly.)
So far, I've turned: a spurtle, a snowman bottle stopper (needs to be finished), a pine mallet turned for practice in anticipation of turning one from cherry acquired last week, a little bat, a vampire stake, and an ornamental honey dipper (not originally ment to be a ornament, I made it as a joke, but I can stick with it being an 'ornament')/
I also completed a set of winding sticks yesterday that were part of an assignment in Shannon Rodger's Hand Tool School. We have permission to blog about our projects so you can expect to see a blog post on that soon.
Before starting another project post however, let's finish this one...here it is....
Bench Plane Shelf - Phase 3
Glue-up and Finishing
Before putting actual glue to wood, I did a little light sanding to get rid of the grime left behind by the router plane. Yuck.
I glued up the longer shelves to the frame using my two new parallel clamps (and a little improvising...I need more clamps). If you look hard at the picture, you'll notice the bottom most shelve is backwards. I don't know what I was thinking at the time, but I had it right originally, turned it around and took the picture. After sitting in my chair admiring my work for about 5 minutes, I realized my mistake and took it apart again and fixed it. (I forgot about that until I saw it on the picture. hehe)
I glued up the shorter shelves.
Then trimmed and glued the face frame for the upper shelves.
I cut the face frames for the lower shelves too short, so I had the pull the board stretcher out and get some new stock dimensioned (aka. trip to the BORG).
Then I trimmed and glued the ne wface frames on, using my little blue clamps.
My plan was to finish it almost the same way I finished the moulding plane shelf.
I added a sealer coat consisting of 1/2 part dewaxed shellac and 1/2 part denatured alcohol, then a coat of golden oak stain, and finally just one coat of wipe on poly (instead of the two I put on the moulding plane shelf). I found the two coats to be a little too glossy, one coat was perfect.
After the finish, I stapled some Velcro straps to the bottom shelf, because I wont be able to route them when the shelf is installed. I also added some padding to the shelves with some spray adhesive.
I decided to use some cut off brads to help me figure out the locations for the drill holes in RV. (I'm sure I've seen this technique somewhere.) The brads allowed me to drill pilot holes in the back of the bench seat.
I attached the shelves to the RV with some counter sunk screws drilled from the other side of the bench seat.
Finished! Only thing left is to route more strap where they are needed and I can do that later when the planes are on it, as long as it's before I relocate the house. I did a great job! YAY, ME!
Next project....Mesquite Chisel Handles? maybe.
Sunday, October 24, 2010
Bench Plane Madness - Phase 2
I'm hoping the weather warms up a little bit so I can sharpen the turning tools for tomorrow's Lathe session with the HOW group and hone my edges on all my planes and chisels that I used during the bench plane shelf project. I also need find some scrap to make a couple of winding sticks/straight edges...lots of stuff to do, but for now I'm content to stay inside, watch a movie, and write the blog, so here it is... :D
Joinery
I use a smaller crosscut to saw down sides of the dadoes. They aren't going to be noticeably visible, so exact cuts are not required, however, I still do the best I can to save me the hassle of coming back later to clean them up.
Using a chisel I pare away the waste from one side, using the wood on the other side to stop tear out that would be caused by powering all the way through in one shot.
Turning the board over, I pare the rest of the waste away.
All six dadoes are finished in one off the shorter shelves.
With the dadoes needed for the tie down straps complete, I begin the dadoes required to fit the shelves to the frame. The dadoes are laid out using a marking knife and then chiseled down slowly, repeating the process until the dado is at the depth required. I set all my dadoes at a depth of 1/4 inch to keep things simple, but essentially a depth of 3/16 is all that is needed
Once I get to the bottom of the marked out area, I bring in the router plane to even up the bottom of the dado. (I really need to degrease and hone the sole of the router plane...look at how dirty it made the board.) This picture is the bottom side of the lower most of the longer shelves. This dado will be used to hold the short section of frame that goes around the area for the fire extinguisher. All the remaining dadoes that will be cut in the sides to support the shelves will be stop dadoes, meaning that the joinery used will not be visible from the front. The dado on the bottom of this shelf will be covered by the face frame, allowing me to cut it all the way through, which is a little easier.
With all the joinery cut and fitted using the shelves...
I even set it inside the RV to ensure the size and fit are exactly what I was wanting.
Thursday, October 21, 2010
After nearly a year...some lathing!
My Monday night woodworker's group recently began turning and here is a video of me that night on a monster Powermatic with a piece of beetle-bored mesquite I brought from Texas. The end result should be a couple of chisel handles, the operative word here is "should". The handles are currently 60% mesquite and 40% epoxy and I still need to add more to finish stabilizing the holes..
And a second video with sound taken with my camera. I've gotten more comfortable with the process since then, it's intimidating taking a tool to a piece of wood going about 600 rotations a minute for the first time in over a year.
I also took a few pictures that night...
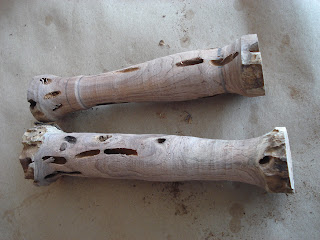
My section of mesquite, the jig it's sitting on is supposed to be used to help square the ends to make ready for putting the stock between centers...the other side does that, actually. This is the back of the jig.
This is where I stopped. I need to pour some epoxy in the bore holes left by insects before I continue turning it.
I enlisted Paul to turn the other one. While everyone else is turning honey dippers and dibbles, we were throwing mesquite bark.
Lots of holes to fill.
I used my small air compressor to blow as much debris and dust out of the holes before the epoxy.
Using blue painter's tape, I seal off the back sides of some of the holes.
Lesson learned: At this point, I tried to stir some mesquite chips taken from the turning to the epoxy. This turned it into a sticky oatmeal cookie and really didn't do what I was hoping it would. I think I should have crushed the chips into dust and added just a little to the mixture. I ended up using the rest of the epoxy without mixing mixing in the chips.
I did use the oatmeal-like mess as much as I could.
I've turned them a second time since and they need another batch of epoxy...my scrap wood chisel handles are now up to about $18 dollars.
Tuesday, October 19, 2010
Bench plane madness - Part 1
The bench plane project was pretty intense. I had some new hand tool techniques to learn and practice, and even made lots of mistakes. I going to break the posting into three, and from this moment forward, write shorter-partial project posts rather than longer-complete project posts. This should help keep attention spans....both the reader's and mine. Ha!
The Bench Plane Shelf! Phase 1
Milling the stock
The stock was already at required thickness, allowing me to immediately proceed to cutting it to final dimensions.
I cambered the corners of the stock prior to using the shooting board. This helps to avoid tear out as the block plane squares up the shelves.
Lesson learned at this stage: Always cut your longer pieces from your stock first. If you cut the shorter ones first, from stock that was planned for longer pieces, it doesn't work. Better yet, layout and mark your cuts prior to putting tools to wood. This is only applicable until someone invents a board stretcher.
Below, I cut out the 1/4 in slats that will become part of the face frame. I learned that riving this piece of oak is not possible during the Molding Plane Shelf project.
Using a couple of hand clamps to hold the stock, I used my planes (and future residents of the shelf) to sneak down to the line. I did have to place some scrap wood in the center to stop the pieces from bowing when being planed.
Shorter ones finished.
Now working on the stock for the longer shelves.
When I rived a piece for the Molding plane shelf, I was left with some unusable stock that had to be replaced. However, the BORG no longer had the same stock on hand, so I had to buy the stock a little wider and cut it down.
Using my superbly permanent saw bench (aka, Mark's carport wall), I used my body weight to hold down and saw the waste off using unique technique (and safe...no, my foot wasn't in the path of the blade).
I don't always wear Crocs when working in the "shop".
Finished. All stock cut to size and ready for joinery....next time!


