Saturday, September 25, 2010

Saw Hotel - Make your reservations!

With me being deep in the middle of my hand plane shelf project for the RV, I figured that I had better post before I forget how I made my saw hanger. ha ha.

I got the idea for this project from a friend in the Hillsborough Orange Woodworkers group and ran with it. I built it using some left over cedar from the Birdhouse project and some other random bits in the shed. For your approval, I present....the Saw Hanger Project! TA DAAA!

First, I planed some cedar flat for the back and face.


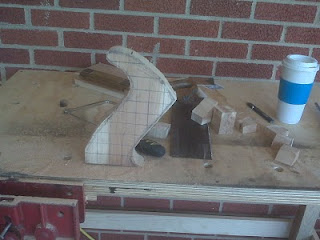
I cut down the back to 24 inches in length, allowing it to fit on the studs in Marks' shed...I don't think I'll be using this set up in the RV. With the length decided, I measured and drew a silhouette of what I was wanting the 'insides' to look like. 


For the inner structure, I first cut a small piece of cedar so I could hide plywood on the side. This seems silly now since I left the top and bottom visible. The idea of the hanger is to have a dowel in place that will use gravity to grip the saw blades.


Six plywood blocks and two end blocks are glued into place. The angle I used on the plywood is 60 degrees (I think).


Then, I cut the face plate to size and glued that on.


Being a perfectionist, I used Stanley #8 to joint up the top and bottom.


With a guide block, I cut some vertical slots using my big crosscut saw (a future tennent of the Saw Hotel). The kerf on this saw is one of the widest I have and it danced a little bit because I was rushing it, but it worked.


For some reason, I felt the face of the hanger needed a little more flattening. Way to go, Stupid. As soon as the blade caught the last slot, the force popped the cedar in half. Sigh.


Thankfully, the break was pretty clean and the cedar fit perfectly, so I glued it back up and continued on. It's shop furniture. ha ha.


While that was gluing up, I cut up some 1 inch diameter dowels to 3/4 inch in length. Just short enough to fit in the spaces between the blocks. I also cut some small tabs to be used as stoppers to keep the dowels from coming out the top.


For no absolute purpose than thinking that it would look cool, I cut and glued in some short pieces of oak dowel...


 ... and then cut them flush. Following up with a paring chisel to totally smooth the surface.


Add a little Boiled Linseed Oil, and it's ready for use. 


Here it is on the wall inside of Mark's shed. It grips quite well, thankfully because it's mounted over the door. It was a good project and helped me get all my hand saws off of the table where they were hiding under everything else. Putting them up there makes them quicker to find and saves them from rubbing against each other, saving me from resharpening them as often. I like it! ... but what will I do when I buy another saw?


Next Project: Molding Plane Shelf

Wednesday, September 22, 2010

Get out of the Shop!

There were three big reasons for me to choose a relocation to North Carolina. 1) It would allow me to be closer to someone I really cared about. 2) I was tired of deserts, I wanted to live with some trees. And 3) I wanted a location with a greater ratio of woodworkers per capita. Retirement meant a new start, and to me that meant North Carolina.

Part of my resolutions was to become more involved in the local community, namely the woodworking community. In this regard I researched and joined three local groups: the North Carolina Woodworkers (NCWW) - an online forums community, the Hillsborough Orange Woodworkers (HOW) - an extension of the NCWW that physically meets up every Monday night, and the Triangle Woodworkers Association (TWA) - which meets every 3rd Tuesday of the month. I actually drive about an hour to go to these meetings and always enjoy reflecting on the night during my drive back. I'm making new friends and learning so much more than I could ever imagine on my own. 

Our Monday night meet-ups normally consist of food (and tasty beverages), working on various projects, and one of the group members demonstrating various tips or techniques. Since I have been part of the group, these tips and techniques have included three kinds of saw cuts (which was passed on from The Schwarz himself), saw sharpening, compass and dividers, and how to mill stock using only hand tools (which I shyly demonstrated). This most recent Monday, we had a special treat. Our guest speaker was Bill Anderson, and he guided us to making better mortises (tenons will have to be another night, hehe).

Bill is a research scientist for the US National Protection Agency and a fine woodworker who studies the techniques and technology found in the 18th and 19th centuries. He also creates and teaches from his workshop, Edwards Mountain Woodworks, and also teaches in Roy Underhill's Woodwright's School in Pittsboro, NC. 

Here are some random pictures of Bill and his awesome breakdown workbench from that night. All of the pictures I took that evening can be found here


I also attended my first TWA meeting last night. I always find it so hard to go someplace new and meet new people, but I am really glad that I did. The TWA is not as "hands-on" as the weekly meeting with the HOW group and it's definitely more formal, complete with charter and cabinet members (Bill Anderson from above is the Secretary of this group). The meetings are broken down into segments including notes, meet and greets, show and tell, and a presenter. This month's guest presenter was Brian Coe, who is the Director of Interpretation at the Old Salem Living History Museum and a talented fine furniture maker.

Brian presented us with detailed information on 8 workbenches found in Old Salem and included demonstrations of some bench accessories that he brought along. Such as; shooting boards (90 degree and mitered), bench hook, donkey ear, a dovetail vise, and a sawing vise. Don't quote me on some of these names, I'm sure that not what they are called, but it's sounded better than thingy-ma-jingy that clamps in with the dog holes and clamps the board so you can saw it without and floppy or chatter.

Here are some photos from last night. If anybody is interested in more photos, leave a comment and I will post the entire set. (Not that I have a lot of people following this blog)


In addition to all the wonderful information I gained last night, I also won a $25 gift card to Woodcraft! That just paid for my membership and I can buy a nice little marking knife, hehe. Other bonuses to clubs are shared libraries, years of combined knowledge, and plenty new friends that are more than happy and willing to help you with a project. Oh...don't forget to factor in the free food, there is always someone going over the top to bring wonderful goodies to share! :D

What are you waiting for? Get out of the shop and join a club!

Sunday, September 19, 2010

Don't Shooting Board the Messenger

As I was working on the Handplane Birdhouse, I realized that cutting stock square with a saw is not easily done and requires practice. A quick and simple way to square up stock for individuals that require practice, like myself, is to use a Shooting Board.

Materials

Being the frugal character that I am, I did a little research and put some scraps together to make my own, quick, down and dirty shooting board. Here's what I got:


1x countertop (cut out for kitchen sink) from Texas
1x 1/4 plywood from Colorado Springs
1x 1"x1.5" oak from Omaha
4x 1-1/4" screws from Handplane Birdhouse
1x bottle of Titibond III also from Handplane Birdhouse

Shooting Surface

I measured and cut down the counter top to approximately 12" x 16" using my dad's old panel saw, and then the plywood to 9"x16". I also jointed the guiding edge of the plywood.


Using some Titebond III (mainly because I had it in reach, but I'm sure it helps the fact that I do all my woodworking outside, humidity and such), I glued and clamped the plywood to the countertop. The plywood does not need to be exact on the surface of the base, but it does need an exact straight edge on the surface that the plane will be using as a guide.  


Fence and Bench Hook

To set the fence, I clamped a combination square to a length of oak (soon to be fence) and to a handplane that was seated snug against the straight edge of the plywood. A little glue and two screws later, I had an oak fence set at exactly 90 degrees to the plywood. I then added another piece of oak to the underside for a bench hook and lubricated the running surface with some candle wax.


Using my grandfather's combination square clamped to the fence, I can also shoot cross grain miters. 


I'm happy with the results. It's not pretty (well, the pattern on the counter top is nice, hehe), but it's definately functional. I would prefer using a low-angle jack plane with it if I had one, but since I dont, I'm using my block plane set with a Hock blade. I was also going to use more oak to frame it out, but didn't have enough, so that will have to wait until I get enough scrap to add one. Maybe when I settle down a little more permanently?

Next Project: Hand Saw Rack  

Saturday, September 11, 2010

Handplane Birdhouse

I found this birdhouse plan in the August 2010 Popular Woodworking Magazine and thought it would be an excellent project to break in the new workbench and perfect timing to completely give in to the Dark Side. (In woodworking, the 'Dark Side' in informally refers to woodworking using only hand tools and historical methods; individuals practicing these techniques are known as 'Galoots', 'Neaders, or 'Neanderthals'.) 

While it took Chris Schwarz only 3 hours to complete this project for the magazine, it took me about 3 days (most of that being lumber preparation and planing). My birdhouse is not quite the same as Chris's with slight modifications and personal preferences taken into account. (That 'should' be read as "mistaken measurements, unforeseen wood movement, poor stock selection, and infinitely less experience".) Built out of Cedar and much larger than I anticipated, I am still incredibly proud of this build. Enjoy.

Wedge and Tote Glue Up

Glue up already? Yup. The first step in making this bird house was to plane up two faces and glue some planks together so they can be shaped into the thicker wedge and tote later in the build.


I do not suggest using spring clamps for glue up. There are not strong enough and allowed my boards to cup from the moisture in the glue. This was a real pain to fix later.


A little flattening on the second set of boards prior to glue up...


...and another glue up. TIP: Use wax paper during your glue ups to avoid sticky messes on parts that aren't supposed to be glued.


Side Panel Shaping

The next step was to get the two sides to identical dimensions.First, I planed the stock flat using my Stanley #8. This beast roars through wood like 'butta' and left the surface perfectly flat in no time.


I then cut the sides roughly to the shape I desired, leaving them approximately 1/8 inch proud of the final dimensions.


To make the sides identical, I clamped them together in the face vise and finished shaping them with a block plane, rasp, files, and some sand paper wrapped around a small dowel. A spoke shave would have made this task go so much quicker and done a much better job, so I am adding it to my wish list along with some more clamps.


Here are the finished sides (and Josie in the doorway). Yes, they really are that big. The birdhouse is a whopping 35 inches across.


Cutter

With the sides shaped, and all the remaining pieces cut to size (3/4 inch thick, 5 inches wide, and cut to length), it was time to work on the cutter. The cutter needed to be 1/2 inch thick, which required me to resaw 1/4 inch from the board.


About 15 minutes later (including a cut thumb and mental designs of an upcoming project for a frame saw), the board is close to 1/2 inch. All that was needed was a quick planing to remove the saw marks.


I finished the cutter by trimming the upper corners and sharpening the bottom edge. I chose a nice piece of cedar that was a little darker and had an interesting grain pattern.


Tote

Now was the time to cut out and shape the tote (handle). This is also when I realized my boards cupped after glue-up and I decided that I really need a few more clamps. I decided to press on since the glue-up was solid in the middle of the board where the tote was to be cut from.

First, I drew some 1 inch squares on the stock and sketched the outline of the tote using the magazine plans and actual tote on my Stanley #4, which was sitting on the workbench in front of me. I then used the 1 inch markings to make some relief cuts for the coping saw. The coping saw could handle the curves with out the relief cuts, but I always feel more comfortable being able to take short breaks when I'm sawing lengthy cuts.


The lines of the tote were just a reference and I was willing to shape the tote to what pleased me at the time while I worked.  

After the tote was cut out, I shaped it using a rasp, files, and some sanding. The cupped boards made little difference in the end product and it needed was a small amount of wood filler in order to smooth out the tote.


I then trimmed the end grain on the base to even it up. The smarter approach would have been to square up the sides and plane the end grain square using a shooting board. (Teaser...Next Project: Shooting Board!)


This is the tote prior to its final sanding.


Wedge

With the wedge stock glued up, I flattened and cut the stock to dimension, and then drew out the wedge.


I cut the end of the stock square as I felt was neccessary. I wasn't too worried about it being perfectly square since it would have to be reduced down to 3/16 inch thick at this point and would be mostly hidden inside the birdhouse.


Then, I cut the angels found on the top of the wedge.


 Corners complete.


I used a Stanley #5 1/4 set with an aggressive cut to make the angled 'wedge'. Thinking back to the cutter, I could have used this technique instead of resawing....but on the plus side, I now have a small slice of cedar veneer available for future projects.


I planed it down close to the line in minutes, using my Stanley #4 to finish it.


 With the angeled ramp-like section complete, I cut out the inside of the wedge.


 Assembly

During the dry fit, I realized I had forgotten a divider on the inside of the birdhouse, This divider separated two of the housing areas for the birds and was very important to future tenants. A quick search through the scrap pile revealed some suitable stock and I quickly shaped a divider up and glued up the front side of the birdhouse.


Sanding Antics: I'm Batman!


The back side is removable in order to clean out the older nests on a yearly basis, so I clamped the birdhouse down, drilled some pilot holes, and screwed the back plate on.


Using an auger bit, I made some 1 inch entry holes. I didn't like these so I moved up to 1 1/4 inch holes using a rasp and sand paper since I don't yet own a 1 1/4 inch auger bit.


Some final shaving to fit with a block plane and some sanding completes the birdhouse. I didn't put any finish on it in order to allow the natural aromatic properties of the cedar to come through and cedar is also naturally weather resistant, ensuring the birdhouse is bird friendly.

I'm not sure where it will actually hang yet. Currently, it is stashed in the RV awaiting a more permanent location. I believe I will hanging it over the threshhold of my workshop when I buy my new house, because it is my first all hand tool project and I am very proud of it.


Next Project: Shooting Board